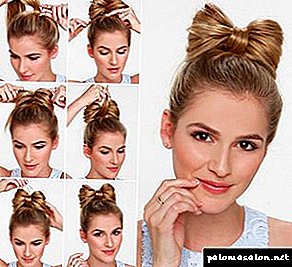
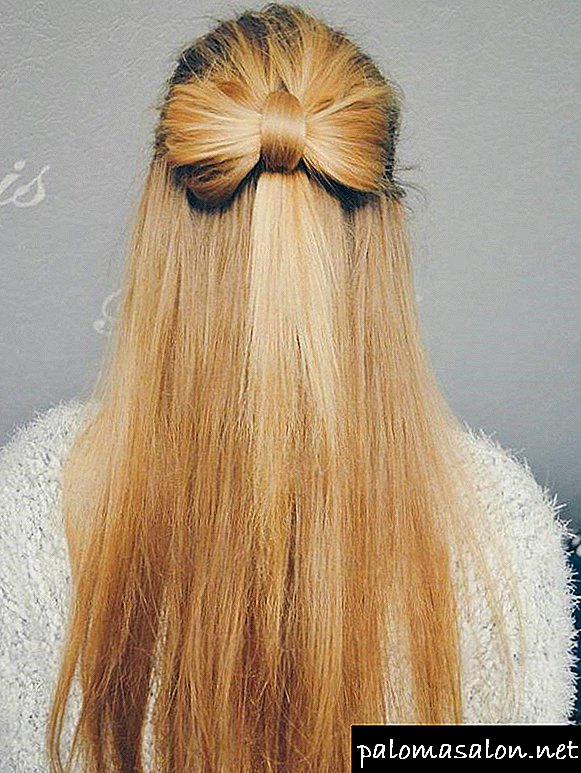
- Comb your hair very carefully. Make the tail high, near the crown. Secure it with a rubber band

- Fold the tail in half. The ends of the hair should fall on the forehead. Secure with a second rubber band. The result was a high beam.
- The bundle must be divided into two equal parts.

- The ends to throw through the center of the beam.
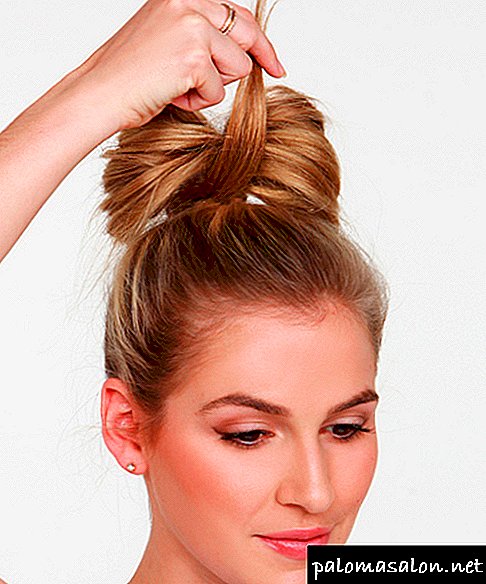
- Secure well invisible.

- Hair sprinkle with varnish, comb them from the side. If several curls were knocked out of the hair, remove them using stealth.


The elegant image is complemented by a light make-up. You are ready for any special event or responsible event.
Step-by-step instruction
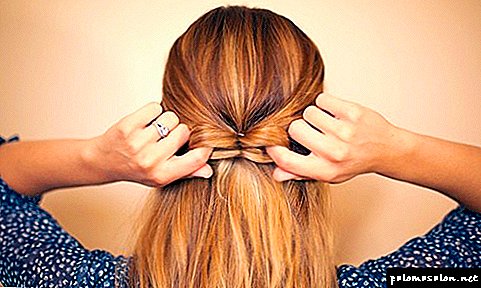
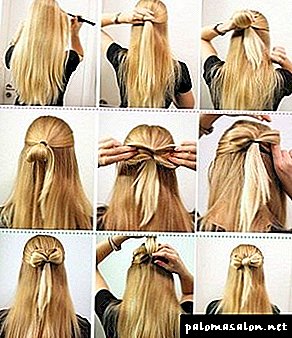
- Comb your hair. Make on the sides of the tail. We will only need curls from the top, the rest remain uncool.

- In the center make a two-piece bundle. The ends of the hair hang down along the head.

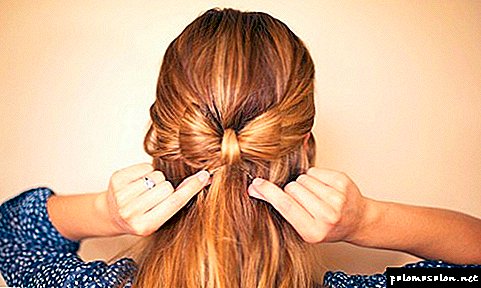
- Divide the bundle into two equal parts, you get 2 petals.
- Through each part perekinte ends of the hair.

- Fix stealth.
- Gently comb and lay loose curls.
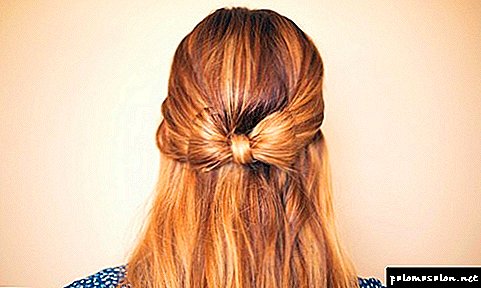
- Sprinkle with varnish the resulting bow and go to the event.


Knowing the step-by-step process of performing such a hairstyle, you can experiment with the size of the bow, hair styling around it and other additional effects.
Ideas beautiful bows for adults
This hairstyle has many variations. Depending on the length and condition of the hair, you can easily find an interesting solution for every day or for a solemn occasion.

The photo shows a smooth transition from the bow to the French braid. After the main element of the hairstyle is made, a braid is woven from the hair in the middle of the head. The rest strands fall freely on the shoulders. They need to be combed well.

"Bow" looks very impressive on long wavy hair with highlights or ombre. You need to do it very high, right on top. The rest of the curls wind on curlers or curling, fix with varnish.

On thin wet hair an even strict "bow" is obtained. Curls that remain "in free fall", curl. Due to the fact that most of the strands are dissolved, the hairstyle looks feminine and very romantic.

Another option for an easy hairstyle is “bow + spikelet”. Suitable for long hair. On the top is a large bow. Need to take about half of all hair. Further, a spikelet weaves evenly from all the hair. Its ends are fixed invisible.

You can make the "Bow" is not in the center of the head, but on the side. The remaining hair to throw over his shoulder.
Bow of hair for girls
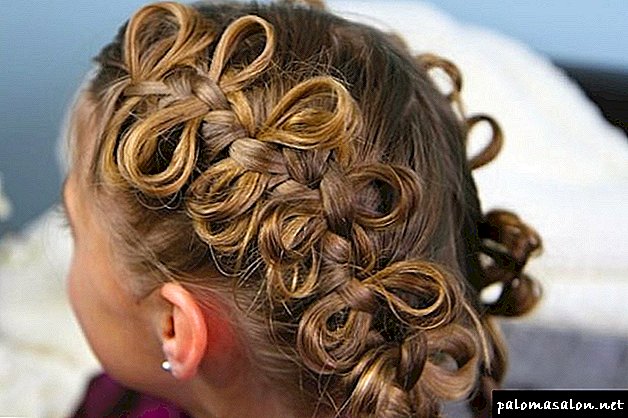
This hairstyle is well suited for little girls. We offer three options for children's hair "Bantik".

Hair is fully collected in the bow. The ends that are left curl. Strict and very beautiful hairstyle looks good in a pair with a school uniform or a beautiful dress.

On the side is a small "bow." Locks need to take quite a bit, and always small invisible, barely noticeable. It turns out a playful little frivolous hairstyle. Suitable for walking or visiting.

"Bow" is done on the side. All hair is first collected in a high tail, then divided into two parts and fixed with hairpins. From the forehead, you can make a thin spike of colored rubber bands - it will turn out very impressive.
How to make a bow of hair - step by step instructions
Ways to do hair bow several, I will describe in detail 1 method, and others you can watch on the video at the end of the article.
If you are interested in how to make a bow out of hair, then the proposed instruction is for you.
First of all, prepare everything necessary for the hair:
- hairbrush,
- gum and invisible,
- hair spray.
1. We collect hair in a ponytail at the crown (or in the place where you want to make a bow of hair) and tighten it with a rubber band. The tail should hold well, because it will be the basis of our bow of hair.
So that the hair does not fall out of the tail, do not wash your head immediately before you do your hair, it is better to do it in the evening.
2. While doing the tail, do not stretch the hair to the end, but leave a kind of loop.
As I said, the hairstyle is done quite easily and quickly, and most importantly, the hairstyle of the bow of the hair allows you to experiment. You can make a bow not from all the hair, but take only a small part, the rest of the hair is best to be wound onto a curling iron. This hairstyle looks playful and original.
Often a bow is made on the back of the head, and strands are released from it to get a pony tail with a bow.
I would like to note that the bow of hair is also used as a wedding hairstyle, which gives the bride an image of charm.
Tools to create a bow
So, let's see how to make a bow on the head out of hair. First, find out what tools are required. Prepare everything you need on this list:
 Hairbrushes: round and with fine teeth.
- Gum. It is best that they match the color of the curls in color, so they will be less noticeable if their edge is seen by chance. For small bows it is better to choose smaller gum.
- Studs and invisible. And also you need to match your hair color. If the hairstyle is performed for the first time, you can prepare them more.
- Hair spray. If the hair is thin or disobedient, you should prefer lacquer strong fixation, and for the happy owner of thick - suitable varnish and medium strength.
- Decorations. Ribbons, rhinestones, hairpins and other accessories that can be decorated hair. It all depends on the place of pastime.
 Hairbrushes: round and with fine teeth.
Varieties of hairstyles
Hairdressers offer many variations of this hairstyle. You can make a high flirtatious bow that resembles the ears of a playful cat, a bow in “Malvinka” will help to create a sophisticated and romantic look, and the look made on the back of your head will add a sophisticated and luxurious look. Even a little girl can make small bows and it will look very cute. It all depends on where to place the bow on the head.
High bow and technique of its execution
This option is ideal for girls with long hair. Also fit the average length of the curls (approximately 10 cm below the shoulders). With this hairstyle, you will definitely become a party star and attract everyone's attention.
Step by step instructions bow hair:
 You need to carefully comb the curls and collect them in a beautiful high tail. The elastic should fit snugly to the head, and the strands should be laid flat so that the hairstyle is perfectly smooth.
- The second rubber band to form a loop and lay it in such a way that the tips were turned toward the forehead.
- Next, you need to divide the strands in the loop into two equal parts and secure them with studs or invisible. Thus, bow loops will be formed.
- Tie the midpoint of the bow with loose tips and fasten it so that it hides the remaining strands.
- For the best durability of a hairstyle, it is better to gently treat it with hairspray.
 You need to carefully comb the curls and collect them in a beautiful high tail. The elastic should fit snugly to the head, and the strands should be laid flat so that the hairstyle is perfectly smooth.
Medium length hairstyle
 It is easy to make a bow on the head of medium-length hair, if you braid a bow in the neck area. Suitable for young women and girls.
If you place the bow along the line of the ears, you will get a daily hairstyle that fits perfectly into the strict dress code of serious organizations and educational institutions.
To create an evening, playful image, make the bow as low as possible, almost at the base of the neck. Step-by-step instruction:
 First, several strands should be separated from the temples, they can be combined with a long bang, combed back. And also should be separated thin strand at the base of the neck. These curls while you can just link, so they do not interfere.
- All hair must be tied in a bun on the back of the head.
- Next should make a loop of strands. In this case, the tips do not leave, as in the previous example, but simply hide behind the gum.
- It is necessary to divide the connected strands in two and fix them. For better fixation, you can use small rubber bands, which should be worn at the base of the loop, can also be used to fix the studs.
- The place of separation is closed with the upper part of the curls that were left in advance.
- The bottom strand is laid clockwise around the resulting design of the hair. At the same time, we are capturing both the bow and the upper strand.
- Fix the hairdo lacquer strong fixation.
 First, several strands should be separated from the temples, they can be combined with a long bang, combed back. And also should be separated thin strand at the base of the neck. These curls while you can just link, so they do not interfere.
Hair butterfly
Very young girls will like the butterfly of hair, which can be “planted” on the left or on the right and create a flirty image.
To create this hairstyle you need:
 Carefully comb your hair so that it lays flat when creating a hairstyle.
- Separate a small strand near the ear.
- Form a small loop. You can weave a part of a long bang without stretching it.
- Divide the strand into two halves and secure them with pins. And the gum and hairpins need to take small sizes, then they will not be noticeable, and the hairstyle will be clearer.
- Tie the loose edge of the hair around the middle of the bow. For owners of medium hair length, bangs can not be woven, and use its strand to hide the gum. Then the loose ends of the tail can be curled and left to fall.
- For better stability it is recommended to use wax or varnish.
 Carefully comb your hair so that it lays flat when creating a hairstyle.
Bow with malvinka
Romantic bow-Malvinka like romantic dreamers. This hairstyle will make its owner a star of a thematic party and is suitable for going to the theater.
It is not so difficult to make it, but it is worth practicing according to this instruction:
 At the heart of the hair is a well-known Malvinka. To do this, select the bunches at the temples and twist them. Gradually, you can add strands and move to the center of the head. The rest of the hair must be left untouched. To hairstyle had a volumetric appearance, the strands can be slightly combed.
- It should be left in the center of a small part of the curls intact, then it will come in handy.
- Next you need to tie the twisted strands into a bun, make a loop and form a bow in the same way as in the previous versions.
- Divide the loop into two halves and secure with studs.
- Now come in handy curl, which was left in advance. With it, you need to hide the gum and twist it between the two loops.
 At the heart of the hair is a well-known Malvinka. To do this, select the bunches at the temples and twist them. Gradually, you can add strands and move to the center of the head. The rest of the hair must be left untouched. To hairstyle had a volumetric appearance, the strands can be slightly combed.
Custom idea with a tail
Many women love to walk with tails. But this hairstyle is pretty boring. It can liven up bow in the base of the tail. Make it according to our instructions:
 First you need to carefully comb your hair, then they will become more docile.
- In the parietal region, select the V-shaped zone and lightly comb it. This will give the volume of hair.
- The rest of the strands to collect in a bun. No need to tie the tail too high, then the bow will not be visible.
- From the tail should be separated a small strand and gather it with an elastic band. She will need to complete the hairstyle.
- It is necessary to separate two more strands and twist them in the form of a bow. You can fix it with a small elastic band, if you fasten it around each loop, and attach the “ears” of the bow to the rest of the hair with invisible hair. The tips can be hidden in the next eyelet, so they will give additional volume.
- With the curl that was left before, close the middle and hide the tips in the hairstyle, securing them with a hairpin or invisible.
 First you need to carefully comb your hair, then they will become more docile.
In similar schemes, you can combine a bow and a Greek bandage, or even make a tail out of bows, and also first braid the pigtails, and form bows out of them.
Original options with weaving
Bow with weaving looks very impressive. Suitable for self-confident active young girls.
To create this hairstyle you need long hair, with medium length hair formation can be difficult. It is made on the basis of the French braid, and weaving can be carried out from the bottom up, and from the top down.
 French braid or spikelet is woven.
- On the back of the hair are fixed with a rubber band.
- Then you should create a loop and divide it in two. Both parts are fixed invisible.
- Loose ends need to be wrapped around the core of the structure; if the hair is very long, you can leave loose strands.
- For weaving upward you need to tilt your head forward, then the curls will be easier to lay, and the bow is formed just above the line of the ears.
 French braid or spikelet is woven.
Baby butterflies
Young women of fashion can offer their own version of bows on a spikelet. Moms will have to try, but it's worth it. And our step-by-step instruction of the bow from the hair will help figure out how to do it:
 The basis is the French braid. You can divide the hair into two parts and braid two braids. As a result, it will look even more original.
- Near the parting you need to leave strands that are not woven into the braid.
- For the next stage, you need a large stud. With its help, you need to get the small curls that remained near the parting and stretch them through the weaving of the braid. So that the curls are not clinging, they can be moistened with water, spray for combing or varnish.
- Next you need to twist the stretched curls of the eight, forming bows, and hide the tips in a braid. If you pull two curls at once through one weave and twist them with eights, then you may end up with one of the options for the butterfly hairstyle.
- Small bows should be fixed with small pins.
 The basis is the French braid. You can divide the hair into two parts and braid two braids. As a result, it will look even more original.
Girls can also be offered a big showy hair bow. This hairstyle will make your baby a star of a children's holiday.
To create such a bow, follow the sequence of actions:
 Divide the child's hair into two halves: upper and lower.
- From the upper part, make two identical tails above the ears, but at the same time, the tips of the tails do not need to be pulled out completely, but left with eyelets.
- Another rubber band to split the loop into two halves and secure left and right. Do the same with a different ponytail.
- The free ends of the tails should be wrapped around the bows in the middle so that the rubber bands are not visible.
- The lower part of the hair can be left free.
 Divide the child's hair into two halves: upper and lower.
Useful tips
To make the hair perfect, there are several tricks. Professionals will not tell you about them, but you need to know:
 In order to make the hair more obedient, you should brush your hands with wax or gel.
- If the tips are not enough to hide the gum and wrap the middle, you can use a ribbon. And if the hair remains too much, you can weave a pigtail out of it and form a middle part with a pigtail.
- A bow can also be used to decorate another hairstyle, such as a shell, and make a bow at the side.
- Curly hair should be straightened, otherwise the bow will turn out to be sloppy.
- In the end, it is necessary to fix the hairstyle with lacquer so that after a few hours it will not break up.
- You can use various decorations: small flowers, pearls, rhinestones and other stones, then the hairstyle will look more solemn.
 In order to make the hair more obedient, you should brush your hands with wax or gel.
Hair bows are modern hairstyles that help create unforgettable day and evening looks. To make them, it is not at all necessary to make an appointment with a hairdresser each time, it’s enough to practice using the instructions given.
Classic hairstyle
The classic hairstyle of a bow of hair implies smoothly assembled strands and one volume bow. The main difference is in its location, size and shape. It all depends on the shape of the face and the purpose of styling - evening and casual options are somewhat different.

Hairstyle bow on medium hair often involves a bow at the crown, like Minnie Mouse - mainly because of the small length of the strands in the face. It turns out pretty playful!

Want more dynamics - make a bow over your ear. Thus, you will not only make the image more cocky, but also divert attention from the large nose.


Oblique fringe, if you do not put it in your hair, perfectly corrects the shape of the face, hiding the broad forehead.

A bow with an enlarged middle part and a long, smooth bang looks more interesting.

Hairdo bow on long hair in the evening version: side parting and a bow over the neck. Very elegant!

If you release two locks, like the free ends of a ribbon of a real bow, the hairstyle will become even more interesting.
Bow hairstyle at the base of loose hair
If you do not have the habit of smoothly combing your hair, it is possible to make a bow of hair as an accessory. This styling looks very solemn and elegant!
Perfectly straightened, shiny hair and a neat bow of strands tucked away from the face are a surprisingly simple and elegant solution for evening styling.

Want more solemnity? Twist the spiral curls, leaving the texture of the bow itself even!

Multicolour coloring will make this styling even more creative.
Bow of hair in combination with braids
Hairstyle bow for short hair is practically not done, yet the strands should be long enough to form a bundle in the form of a bow. Well, if we already have curls of medium and long length, it would be blasphemy not to use the newly fashionable braids in the paving!

Classic braids and volume bow on the top: an option for a girl with medium-sized features.

An ideally sleek bow over the French beam on the back of the head, decorated with a scythe in the middle, will suit both the wedding ceremony and the visit to the opera.

A braid of small braids - what is not a way to diversify the styling?

Who said that the bow of the hair should be one? Two French braids ending in exquisite beaded bunches are suitable for girls who love interesting details.


Another version of the installation based on the French spit. Here, certain strands during weaving are stretched out in such a way that they form many bows. You can use all the hair, or part of it - depending on your preferences and density of hair.
7 easy ways to make a bow of hair
Before you start creating any of the hairstyles, you need to determine the location of the bow. It can be on top, bottom, side, or a strand dotted with small bows. The color of the gum should choose the most similar to the hair, so that it was not noticeable.
 Bow adorns the surround high beam
  Before you start creating any of the hairstyles, you need to determine the location of the bow. It can be top, bottom, side.
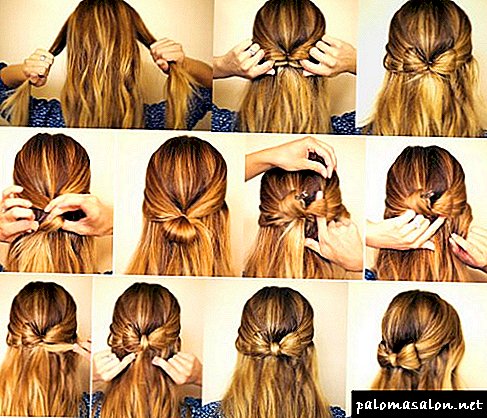
- Method 1. For long hair.
The first step is to collect the hair in a high tail. It is tightly tied with a rubber band. The second rubber band is fixed the tail so that it curls in half, forming a loop. At the same time, the ends should fall down in front of the frontal zone of the head. Then the resulting loop is divided into two equal parts with the tips falling to the forehead and fixed with invisible backs.
 Hairstyle bow on long hair
  Hairdo bow on long hair. Step 1-4
  Hairdo bow on long hair. Step 5-8
Long hair allows for experimentation. Therefore, we can distinguish another method of creating a stylish bow at home. The tail is also made for it, but it is divided into three parts by rubber bands. Each gum should be carefully hidden behind a small strand, wrapping them and fixing them invisible. Then the split tail must be laid so that it is in front of the base of the tail. The tips can be evenly distributed behind the head, hidden in a bow, or positioned so that they look funny because of the hair.
 Hair bow - stylish and original hairstyle
At the end, the hair is sprayed with varnish to keep well.
- Method 2. On the hair of medium length.
First you need to gently comb all the hair in a high tail. While tightening them with a rubber band, it is not necessary to remove the hair to the end. There should be a loop, with an end that falls off in advance. The loop should be divided into two equal parts and smoothed in the middle. The front strand is shifted back, forming the middle of the bow. Carefully attached invisible.
 How to make a bow of hair on medium hair
The tail can be tied in a different way. From the main tail is selected a small strand for the core and is fixed in front. Then the tail is divided into two parts using the second rubber band. It is fixed at the very tips. From the hair that remained between the elastic bands, is a loop. She left the strand rewound and closes the bow.
In conclusion, we fix the design with a lacquer of strong fixation.
 A small bow decorating the high beam
- Method 3. On short hair.
Owners of short haircuts rarely boast a beautiful hairdo. Usually they are costing styling or pile. However, do not deny yourself in female tricks. If you have patience, a bow of hair can be made on such hair.
 From short hair you need to select the longest strands and turn the bow out of them.
First, you need to separate two identical strands in the temporal area and take them to the back of the head. There they are joined by a thin, almost imperceptible rubber band so that a small loop is obtained. That is, pull the tips out of the gum is not necessary. Then we divide the loop into two “ears” of the bow. Hairstyle is obtained from the bottom of the head. The bow should be fixed with additional barrettes so that it does not hang, to the bulk of the hair. The middle is done by a separate dedicated strand. It is best to select it in advance from above so as not to repeat all the manipulations anew.
 Beautiful bow on the hair of a little girl
- Method 4. In combination with malvinka.
Malvink's hairstyle is familiar to all girls since childhood. Its essence is that the side strands, twisted into thin flagella, to make a rim on the head. Behind they are connected with a barrette or a rubber band, and the rest of the hair remains untouched. To create an evening Malvinki, you can twist them, or vice versa, align.
 Malvinka stylized bow of his own hair
 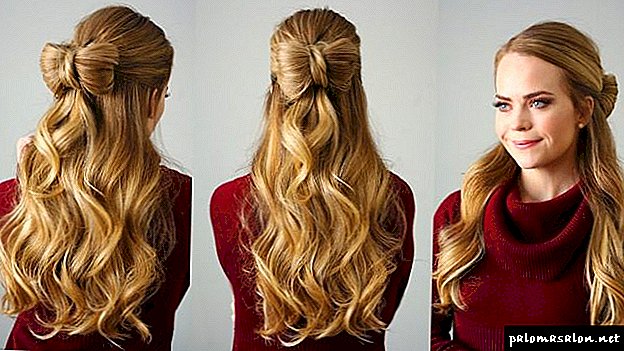 Volumetric bow on the top decorates Malvink's hair
Owners of long hair are lucky. They can stylize the familiar Malvinka and use a beautiful bow of their own hair instead of the usual hairpin at the ends. So you can not only save on hairpins, but also surprise others with originality of hair.
 Neat bow in malvinka hairstyle
  How to make a bow at the crown. Step 1-4
  How to make a bow at the crown. Step 5-8
The execution of this hairstyle is slightly different from the classic version. To do this, you need to collect not all the hair in the tail, but only select the top strands. It will not be very thick, but it will look great in the end. The bow itself is formed according to the previous scheme. The resulting loop of hair should be divided into equal parts, twist them together and fasten the core with a separate pre-prepared curl.
 Malvinka with a bow of his own hair
  Malvinka with a bow of his own hair. Step 1-3
  Malvinka with a bow of his own hair. Step 4-6
  Malvinka with a bow of his own hair. Step 7-9
- Method 5. Bow as decoration weaving.
You can experiment with pigtails in different ways, creating new amazing images. Collected convenient hairstyle can be worn on daily walks, trips to shops, to work and to festive events. Hair bow with a pigtail will last long and will not spoil the mood of the fallen strands.
 Bow on the top decorates a long braid
  Bow decorates braid fishtail
To create it, you first need to braid the well-known spit-spike. But you need to weave it not in a standard way, but from the bottom up, starting from the neck, going up to the back of the head. To make it comfortable to weave, tilt your head forward, comb your hair well, and treat your hands with wax or gel. Further the usual French braid trudges. In the process, additional strands are selected from both sides and added to the main ones. When the braid is braided to the level of the head, you need to tie a rubber tail and a loop is formed from the remaining ends. The loop is smoothly turned into a bow, dividing it into two equal parts. The locks left in advance fix the core.
 Colorful Hair Bow
  Back French braid, turning into a bow
  French braid, braided from the base of the neck, turning into a bow. Step-by-step instruction
Braids can be weaved in different ways in all directions. The main thing is to leave part of the hair to create a bow.
- Method 6. Bow on the side.
For hairstyles need a beautiful gum. First, the hair should be divided into four parts. They should be the same, so the zone from the ear to the ear is allocated, and then the comb draws a line in the middle of the head. All the hair for the hair is not needed. It is necessary to choose one of the parts, depending on which side the bow should be made of.
 Bow on the top of the side
A strong tail is formed from the selected hair with a rubber band. You need to tie a loop with a beautiful rubber band, and hide all the ends under it. From the loop is formed a bow, whose ears should be well straightened so that they are voluminous. Secure the design with stealth or studs. To keep a neat look for a long time, you can use varnish.
Hair that remained can be left flowing, slightly twisting the individual strands, align or braid in braids - any creative wish.
- Method 7. Small bows.
The basis of the hairstyle is the French braid, however, having gotten to do small neat bows on their own, they can be introduced by separate elements into other hairstyles. For ease of weaving, you will need one large hairpin for work and many small ones for fastenings. In the standard version, bows are located on the sides of the head, but in fact they can be made diagonally, along the fringe, around the head or behind.
 Back French braid, studded with small bows
  Spit of bows across the head
For a hairstyle, you need to comb your hair and divide it in an even part into two equal parts. A hair strand of 1–2 cm in size is separated near the parting. If the bows are to be large, you can take the strand thicker. It is removed from the rest of the hair mass separately.
On the right side you need to braid a tight French braid and tie the tip with an elastic band. Next begins the formation of bows. Separate pre-strand need to sprinkle with water or varnish. A large hairpin is threaded through one binding of the braid and catches the loop of the treated strand, pulling it out.
 A small bow on the back of his head
It turns out a bow, the size of which can be adjusted by changing the size of the loops. The tail that remains from the strand should be put along the braid, the next strand will hide it.
Repeat the action to the end of the spit.
Tip!Before you do hair, hair need to prepare. Pure and dried, they will be obedient, especially in combination with gel and mousse for fixing. For more shine, you can use wax.
 Tail decorating
  Bow Tail
Bows of ribbons with their own hands: simple, fast and beautiful
There is not always time and desire to do hair on their own. For such cases, you can stock up with original bows of their own production from ribbons. They can be made in different sizes, shapes, colors. Any hairstyle will look bright and stylish with a homemade accessory.
To make a simple satin ribbon bow, you need to arm yourself with 20 cm of ribbon and a good mood. The material is folded in half and a loop is obtained, which is lowered down. The resulting two small loops cross each other.
 The decoration for your hairstyles can be made with your own hands.
For a flower-shaped bow, it is recommended to choose a ribbon of average width. It is twisted in such a way that the first coil received is crossed with a tip crosswise. Repeat the action must be repeatedly, until you get a flower of the desired splendor. It is fastened with the help of the last turn and knot in the center.
 A bright pink wide ribbon bow can complement your tender look.
  Ribbon bow can be put on the elastic band or attached to the hair with a barrette
A small bow is convenient to do with a regular plug. To do this, the fork is wrapped with a thin ribbon so that one edge is free. It should be about 5 cm in length. This end is wrapped around the plug and pulled out at the bottom of the short edge. Then this tip is held in the middle of the cutlery teeth at the top of the ribbon and lowered. It remains only to thread the end of the tape into the loop that has formed.
Bow in combination with a beam

A tall volumetric, slightly sloppy bunch and a small bow as decoration are almost a classic.

If you add a braid as a bow jumper, and make a bunch on the basis of a special elastic band, you will get much more elegant!

Long hair can be twisted into a bundle and wound around the bundle, like a ribbon from a bow.
Bow hairstyle with additional accessories

Bangs, curls on the face, flowers and a voluminous bow of hair - an option for fakes!

We make bets: a bow of hair, or of a kerchief looks more effective?

If you make a bow of hair is not enough skill, use a barrette that does not contrast with the hair in color. Well, after our master class, you can try out new skills.

An alternative to the classic Bantu - strands of tail, threaded into a loop of hair. You can use chignon.
How to make a hair bow out of hair: a simple master class
In the photo below we offer you a simple recipe for creating a bow of hair step by step. This is the very basic classic version, on the basis of which you can later experiment. Preliminary preparation for styling includes washing the hair and drying it with a hair dryer; if necessary, you can additionally straighten the strands with an iron and apply a smoothing agent with a light fixing effect. So, we do the laying in stages:
- Gather the hair in a perfectly smooth tail, without stretching the strands through the last round of the elastic to the end, leaving a loop about mid-length.

- Divide the loop into two equal parts.


- Hair left free at the bottom of the gum, twist into a bundle and lift up, separating the “ears” of the bow. Secure the invisible. You can instead braid braid braid, or leave a perfectly smooth flat strand.

- Wrap the remaining end of the strand under the "ears" of the bow, hide it in one of them and fix it with stealth.

Congratulations! Now you can make a bow out of your own hair! We offer you two more videos with more complex hairstyles.
Bulky hair bow with imitation ribbons for girls:
French braid with lots of bows:
Hair "Bow": for what cases is suitable
Hair bow is a universal hairstyle. It can complement the casual, business or solemn image.
For a classic and casual look, a bow made on the back of the head with a fringe smoothly combed back or on its side will suit. In the classic image the emphasis is on outfit, so it will fit more simple styling.
On special occasions or a romantic date, a bow made at the top of the head will look perfect. In this case, the hair can be decorated with accessories.
Tools for creating hair "Bow"
Before you start to do hair, you need to prepare the tools you need. The main thing is not to forget anything so that in the process of creating the bow, you do not have to look for any tool.
Tools that are needed to create a bow of hair:
- a pair of rubber bands of different sizes
- studs
- hairbrush,
- invisible (necessarily the same shade as the hair),

- flat iron (used for styling unruly hair),
- decorations (optional),
- hair spray.
How to make a bow for long and short hair
Hair bow from hair step-by-step instruction (pictures are given at the end of the article)
Step p / p
For long hair
For short hair
Comb your hair well
Carefully comb your hair
Braid the tail. On the back of the head or any other place of the head
Braid tail on top or just below
Braiding the tail, the hair is not fully tightened; it is necessary to leave a small bundle of about 5 cm and then divide it into 2 parts. Secure invisible each side
The tail is divided into 3 equal parts. Using the second gum, form halves of a bow from two parts and stab them with invisible ones.
3 part of the hair a little comb. Wrap the middle of the bow and stab stealth
The tips of the hair should be left on the face. They should be shifted back in the middle of the bow and secure invisible.
Use the varnish to hairstyle lasted longer
Fix the hair style fix varnish
Step-by-step instructions on the hairstyle of a small bow of hair with flowing hair in pictures allow you to accurately and correctly collect the curls.
Bow for long flowing hair
Loose hair gathered at the back of the head can be decorated with a bow of curls, which will give the hairstyle originality. Sequencing:
- brush hair,
- from the temples to separate from both sides on the strands and hold them to the back of the head,
- behind the head combine the strands together and braid the tail (the volume of the hairstyle will depend on the thickness of the strands),
 Popular and unusual hair bow of hair: step by step instructions and pictures
 - using the second gum, make a loop from the tail (the longer the loop, the larger the bow),
- the loop is divided into 2 identical parts and stab stealth,
- the ends of the tail shift through the middle of the bow and stab the invisible,
- fix varnish.
If curls dissolve the curls, then in combination with a bow, they will make the image more gentle and romantic.
You should not make a very large bow on loose hair. It will look ugly and cumbersome.
How to make a bow of two tails
Hair bow of hair (step by step instructions, pictures will help to make it perfect) can be made of two tails:
- First you should comb your hair and straighten it if there are curls.
- Choose a place for the bow, for example, at the back of the head. Split the hair in a direct part by 2 equal parts from the forehead to the top with a comb.
- Braid 2 tails from each half, necessarily on the same level. Part of the loose hair remains on the back of the head.
- Tie bottom 1 and 2 tail rubber band so that the distance between the rubber bands was the same.
- Form the tails of the tails. Each tail is bent and gum together are connected by pins.
- Hair tips to comb and hide under the loop.
- With a thin strand, with the remaining loose hair, make the middle of the bowknot with a pin.
- It is necessary to fix the hair with lacquer.
 Hairstyle bow Malvinka from hair. Step by step instructions and pictures
Hair "Bantik Malvinka": instructions for creating
The hairstyle with a bow of Malvina hair has the following step-by-step instruction with pictures:
- first of all, comb your hair,
- braid the tail of the front and side strands, part of the hair should remain loose,
- when doing the tail, the hair is not fully tightened, it is necessary to leave a small bunch,
- the beam is divided into 2 equal parts by size,
- make each part a half bow and secure invisible,
- stretch the tips of the tail hair through the base of the hairstyle to get a knot of bow,
- loose hair twist,
- fix the entire hairstyle with lacquer.
“Malvink's Bow” is made closer to the crown of the head, and not in the middle.
Bow of hair with braids
This hairstyle is considered original and stylish. It consists of a pigtail and a bow of hair. Only in this case the spikelet weaves, on the contrary, from the neck to the back of the head.
How to make a haircut:
- braid the French braid on the combed hair, bring it to the back of the head and collect the hair in the tail, leaving a small bun for the bow,
- make a bow, dividing the bundle into 2 halves and securing the ears of the bow with invisible beings,
- hold the tail of the central part of the bow and stab it invisible,
- use varnish to hairstyle lasted longer.
Braid with small bows of hair
Hairstyle with small bows of hair, woven into a pigtail, has a simple step by step instructions. The finished hairstyle result is clearly visible in the presented pictures.
Execution scheme:
- Thoroughly comb your hair over the entire length.
- Separate from the temple on the left side and leave a small strand (up to 2 cm wide) to the right ear.
- To create a braid, on the left side you need to take a part of the hair and divide it into 3 identical strands.
- 1 strand is thrown over 2 and becomes central.
- Right strand is shifted to the next strand, now it is in the middle.
- Continue braiding by adding side hair to the braid.
Important! The side strands when added must be the same size so that they do not stand out.

- When all the hair is woven (except for the left strand), make a couple more bindings and fix the hair with an elastic band.
- Now you can make bows. At the beginning of the spit under the first lower arc push the pin.
- Take part of the hair with the remaining strands, comb it and then moisten it.
- Fold the loop out of the strand and thread into the pin.
- Start to pull the pin down so that the bow is formed. It is necessary to hold the loop with your finger.
- On long hair, so that the bow is not huge, the extra hair ends should be wrapped around the finished bow.
- Take another strand for the next bow and repeat the action with the hairpin under the second arc of weaving.
- So make all the bows.
- For the last bow, thread the pin into the extreme arc of the weave.
- So that the bows do not stick out strongly, press their edges with studs to the head and fix with varnish.
All waves in which the bow was made are fastened with pins. At will, you can decorate your hair with beautiful hairpins with flowers, they will be both decorations and hair accessories.
Professional Tips: How to Perfectly Make a Bowtie Hairstyle
Doing hair "Bow" of the hair, except for step by step instructions, even in the pictures, even without them, you must follow the recommendations of experts. This will help make your hair perfect:
- Hair will fit better if you wash your hair in the evening of the previous day.
- To the bow did not fall apart, the tips of the tail must be well fixed.
- If the gum is noticeable, it will not look very nice. Therefore, the elastic to create a bow should choose a thin and neutral color.
- Fixing hair with lacquer, the main thing is not to overdo it. Otherwise, the hairstyle will get a wet effect, like after rain.
 Do not use too much varnish to fix the hair.
 - To secure the bow, it is advisable to use shortened studs.
- A low bow of hair is best done at the back of the head.
- Gum, hairpins and stealth should be the same shade as the hair, so that they do not catch the eye.
- If there is a bang, then it must be straightened with an iron. So it will look more attractive.
Considered hairstyle can be done independently in no more than 20-30 minutes. In addition, for each image there is a version of a bow of hair. From the very first attempts hairstyle can not always work. Do not be upset. For a few workouts, you can learn how to make a bow of hair of varying complexity.
What you need for hair "bow of hair"
The classic version of the hairstyle originates from the ballrooms of Western Europe of the early 19th century - thus, women of fashion in their magnificent dresses decorated their hair. Renewed the tradition of shocking stars of our time - Lady Gaga, Sarah Jessica Parker, and after them the stylists and designers at fashion shows.
Hair bow from the hair is not for everyone, it should not be done:
- girls with thin, naughty or, on the contrary, tough and not amenable hair,
- to owners of a plump figure - instead of a light figure, it will become heavy,
- women aged - playful bow will look frivolous.
Before you start to do their hair, it is important to prepare the necessary accessories.

You will need:
- hairbrush,
- styling products
- 2 strong gum in the color of hair,
- hairpin and at least 3 stealth,
- barrettes with ready-made bows,
- decorative elements - flowers, butterflies, pearls and rhinestones.
Hairstyle should be done on clean straight hair.
Simple and fast option to create a bow of hair
If there is no time, and the bow needs to be done quickly, then a ready-made hairpin-bow will help with the color of your hair. Such bows are made of artificial and natural hair, with the correct selection of shades of curls and hairpins, hardly anyone will notice the difference. In such a simple way, you can decorate the familiar beam and give the elegance of a banal Malvinka.
Method 1. Almost “malvinka”:
- To do this, divide the hair into two sections from ear to ear and connect the strands with an elastic band.
- Attach a hairpin on top of the gum.
Method 2. Bundle:
- Collect the hair in a bun with Donat. So the hairstyle will be neat and last longer.
- Attach a hairpin from the desired side - front or side. To make hair look natural, choose a design where the bow will not be higher than the beam.
Hair hairstyle for short hair
Girls with short hair can also, despite the length, afford a bow haircut. The shape and volume of the bow is directly dependent on the length of the hair.
If it is up to the shoulders, then we can safely begin:
- First you need to separate the front strand of hair - this is to decorate the middle of the bow.
- Separate one thick strand on both sides of the temples and fasten twice with one rubber band. At the second threading, form a loop.
- The resulting loop is divided into two parts of the bow, decorate with a pendant and fixed with foam or a medium.
But this is not the only way that owners of short hair can use. Also, they will suit hairstyle with small bows. Below will be considered how to make them.
Bow of hair for medium hair
Here you can use both the classical method and others intended for this length of hair. It is believed that medium length hair is not at all difficult to create interesting variations of a hair bow. 
Instruction:
- From the side of the head, where the bow will be, you need to collect the tail.
- From the tail to separate the core and secure in front.
- Secure the tip of the tail with another rubber band.
- From the resulting hairstyle to form a bow and secure the invisible under the "ears".
- In the same place to fix a tail from the middle. To do this, lay the strand in advance and transfer it strictly to the middle between the “ears” and fasten the bottom. If the hairstyle is like, then fix all the varnish.
Hairdo bow for long hair
The easiest way to make a bow of long hair.
And how to create it, shows step by step instructions:
- Fix the ponytail in three places at equal distances with thin rubber bands.
- Each gum after fixing wrap a thin strand of hair.
- Fix the second and third parts of the tail on the head with stealth hair color. As a result, you should get a bow.
- Lock the remaining tail behind the bow. To add some charm to the hairstyle, you can divide the remaining tail, fix the sharp ends with gel or wax and pull them out behind the bow. The result is a mischievous hairstyle with sticking ends in the middle.
Master class: a bow of two rubber bands
Above we have considered several ways of how to make a bow out of hair. Step-by-step instructions and a photo for each method show that it is necessary to separate a strand of hair for the middle of the bow. But there are 2 ways where the strand is not necessary to separate.
In the first embodiment, it is necessary to collect hair using two rubber bands:
- In the place where the bow will be located, collect the hair in a ponytail.
- Using the second rubber band, collect the hair in the tail, but without threading it to the end. As a result, you should get a bunch and a tail. The resulting tail should be in front, not behind the future bow.
- The bundle is divided into two equal parts, secure stealth from behind, in an inconspicuous place.
- Twist the remaining tail into a neat, weak bundle and transfer to the middle of the "bow", and hide the tip under the hair.
- Hair must be fixed with lacquer.


In the second step you need to perform the following steps:
- Comb and divide the hair into 2 parts - the back and front, which again need to be divided into two parts and individually secured twice with rubber bands - behind the ears and in the middle of the tail. The result will be two tails with two rubber bands on each.
- The first tail should be bent so that the rubber bands at the base of the tail and in the middle are in contact. The resulting "ear" bowtika to put aside in the direction from the ear and secure with rubber bands.
- Repeat step 2 for the second tail.
- The remaining ends of the tails and the hair on the back part can either be straightened or wound on a curling iron and spray the hair with varnish.
Bow on the side
The tail on the side gives the girl a mischievous character.
If this is about you, then arm with a comb and rubber bands for a new hairstyle - 2 bows on the side:
- For hair you need to divide the hair into 2 equal parts.
- Two identical rubber bands need to collect two horse tails.
- Using the second gum to form a loop, under which you want to hide the remaining tail.
- Divide the loop into 2 parts, using stealth loops to attach them so that you get a bow.


This hairstyle will look good on thick hair.
Girls with thin hair can make one bow on the side, using this or any other technique shown above.
Bow Malvinka
Malvinka - one of the most famous hairstyles. In addition to the bow, it will easily turn from ordinary to evening. 
Step by step instructions will show how to make a bow of hair and malvinku:
- All hair, except for bangs, you need to comb back. If the bang is long, then her too.
- It is necessary to separate the hair section at the level of the ears and, connecting them at the crown, fasten with an elastic band.
- At the second turn of the gum to make a loop of hair.
- Divide the loop into two parts, attach stealth in the form of "ears" of the bow.
- Pass the remaining tail through the middle of the bow and either leave everything as it is or hide the tip under the bow.
For walking and meeting with friends, you can straighten the remaining hair. For the evening option, you can wind and sprinkle varnish with sparkles. Just do not apply too much varnish - attention to the hairstyle should attract a bow, and not a festive sheen.
Bow on loose hair
If there is nothing at hand except for a comb and two invisible women, then with the help of step-by-step instructions you can make a bow of loose hair. It is as simple as tying the laces on the sneakers.
Instruction:
- First you need to comb your hair well and separate two thin strands from ear to ear.
- Tie them in two knots, but at the second knot form two loops - “bows” of the bow.
- To fix the invisible, preferably with decoration.
Complicated bow of hair with weaving
The bow can be not only an independent daily or holiday hairstyle, but also complement others. For example, a beautiful cute bow can be woven into a spikelet. This hairstyle will look original because of the unusual braid and bow.
 Before you make a bow of hair, you should carefully read the step by step instructions.
Instruction:
- To create a hair you need to tilt your head down and comb your hair well.
- Starting from the neck braid French braid.
- On the back of the head - the completion of the spit. So that it does not fall apart, it is important to secure it with an invisible small rubber band.
- From the resulting tail, you need to separate a small strand for the future core, and fix the rest of the hair with the second elastic band.
- When re-threading the tail, form a loop and divide it into 2 parts.
- Secure each “eyelet” with an invisible one.
- From the deferred strands to form the middle of the bow and hide the tip of the tail under the bow.
Variants of a bow of hair for evening hair
Hair bow can be easily turned into an evening haircut:
- Make a “bow” using any of these techniques. For the release, a bundle with a bow, malvinka and just a bow at the top will look perfect.
- Glue rhinestones, ribbons or hairpins with stones under the main color of the dress or jewelry.
- To hairstyle lasted a long time, sprinkle it with lacquer strong fixation.
How to give curls volume to create a bow hair style
Beautiful bow looks great on thick hair.
But the owners of thin hair do not need to get upset, because they can achieve the desired effect if they follow these tips:
- The main rule for the transformation of fine hair into thick hair is to wash your hair with the right shampoo, that is, the one containing silicone, protein and keratins. The last two substances are included in the hair structure, and the silicone covers the hair with a thin film that protects them from the harmful effects of the environment.

- After washing, it is necessary to apply mousse or gel to the hair for volume and blow-dry it, tousling with fingers at the roots.
- Before you do your hair, you can wind the strands that will be under the hair. Other options - to braid a few thin braids for the night or make a pile. The latter option, though fast, but severely injure hair. Therefore, you can use it as a last resort.

Learning to make a beautiful bow is not as difficult as it seems at first glance. The main thing here is not only the availability of step-by-step instructions, necessary materials, but also time with patience. A little practice and be able to surprise others with beautiful and original hairstyles.
Video: how to make a bow of hair
How to make a bow of hair, see the video clip:
Hair bow “malvinka”, master class:
How to make a bow of hair: step by step instructions
Preparing hair for hairstyle
Before you begin styling, hair should be prepared. They must be thoroughly washed and dried, so that you will not have difficulties with unruly curly locks, they must be leveled with a flat iron.

Hair bow from hair 1 way
Making a bow of hair

- Determine the location of the bow
First of all, determine exactly where your bow will be located? On the back of the head, top or side. In this place we tie up the hair in a normal horse tail. Try to use a thin elastic band, the color of which is as close as possible to the shade of your hair.
Making a bow center
It should be carefully separated from the upper part of the tail thin strand (1.5-2 cm wide). Put it on the head, in the direction of the forehead. Fix the hairpin, in the future it will be needed to create a beautiful middle of the bow.
Around the middle of the tail we tie another gum. The hair between the elastic bands gently divide into two equal parts - it will be the "ears" of your bow. After separation, they should be formed, fixing invisible. The tail, which is located below the second rubber band, is also divided in half - and, slightly twisting each strand into a harness, we hide it under the “ears”. The thin strand, previously separated, is carefully lowered, forming the center of the bow with its help. We fasten the invisible or studs with the decor, and again hide the tail under one of the "ears". A little hairspray and your amazing and stylish bow is ready.

Bow of hair 2 way (photo)
- The hair collected in a tail in the last turn of an elastic band is not stretched it to the end. You have left the end, which you have in front.
- Then, divide the tail into equal 2 halves and smooth.
- We shift the tail back and fix it with invisible ones. We hide the remaining tail with the help of 2 invisible beings.
3 way to make a bow of hair

- We collect hair in a tail, we wrap a tail in one thin strand to hide an elastic band. We fix the end with an invisible eye so that it does not fall out of the hairstyle. Spray varnish our strand on the tail and smooth fingers.
- Divide the tail into 2 equal halves and comb thoroughly. After that, start to twist the strand on the finger from the end to make a hollow circle. Lay it near the tail, adjusting the resulting roller. We fix it invisible from the reverse side. Invisible pick the color of your hair. With the second strand we perform similar manipulations.
- The hairstyle is ready, we decorate it with a beautiful hairpin on the tail or in front of it.
Video instruction on how to create a hairstyle from a bow in 3 ways

4 ways to create a bow of hair
- Making a tail. Tie gum from above, from the base of the tail down. We hide each elastic behind the hair strand, securing the end to the invisible.
- We put the tail in the bow so that it is ahead of the tail.
- We pin the end of our main tail with a rubber band to make it flat. Then we fasten the bow with invisible or studs and with the help of varnish or wax we make sharp ends sticking up.
Malvinka bow
Separate the top of the hair at the crown and form a bow, as described above. Optionally, we select the hair at the temples or leave curls. Having formed a bow, we don’t hide the remaining strands, but we put it and wind it on curlers or curling iron, tongs.
Evening option in the style of Malvinki (video)
This is the easiest way to make a hair-bow. It is an ideal solution for owners of long, or medium length, straight hair. However, the use of curling-corrugation will help make your bow even more original and mischievous. To do this, at the stage of preliminary preparation of hair, give them light waves.
Variants of a bow of hair with weaving
Bow of hair (photo) with weaving
There is another way to make the hair more unusual and stylish. Pre-weave a pigtail cone. The difficulty lies in the fact that weave will not have to top down (that is, from the neck to the neck), but vice versa. Your pigtail will rise from the neck to the back of the head.
How to make this hairstyle?
Bend your head forward, carefully combing and brushing your hands with wax or mousse, begin to weave the usual French braid. Pick up strands on both sides and add to the main ones. Bringing it to the back of the head, we tie up the tail and form a bow according to the steps previously described. Spit can be located not only below the level of the bow.
How to weave such a braid, look at the video from Lily Moon
 Secret: owners of "thin" or thin hair, this hairstyle is also suitable. It is enough to master the ways of giving the volume described in the article how to make a wave on the hair. Paying particular attention to subsections with instructions on how to create waves.
Those wishing to make a bow with a scythe should learn the instructions on how to weave the French braid described here.
To complement the bow of hair with a spectacular little crown and all the secrets of its weaving are available at this address http://ovolosah.com/parikmaher/kosi/7-master-klassov-prichesok-koron-iz-volos-foto-video.html.
Hair bows from hair (video)
Pigtails can be braided on either side of it. Or, braid the braids in the tail prepared for separation, so that each passes along the outside of the shaped “ear”.
If you do not want to form a bow of all the hair, you can make it small by using a relatively small strand. To do this, tie the tail, after separating the hair at the nape. Curl a little strands that do not fall into the bow - this will allow you to create an incredibly gentle, romantic image.
How to make small bows? or braid with bows of hair

Braid with small bows of hair
Delicate small bows can be added to almost any hairstyle with a scythe. We braid a not very tight pigtail, and then, pulling out several strands from it, form a bow. In order for the “ears” of the bow to hold well, they should be fixed with varnish.
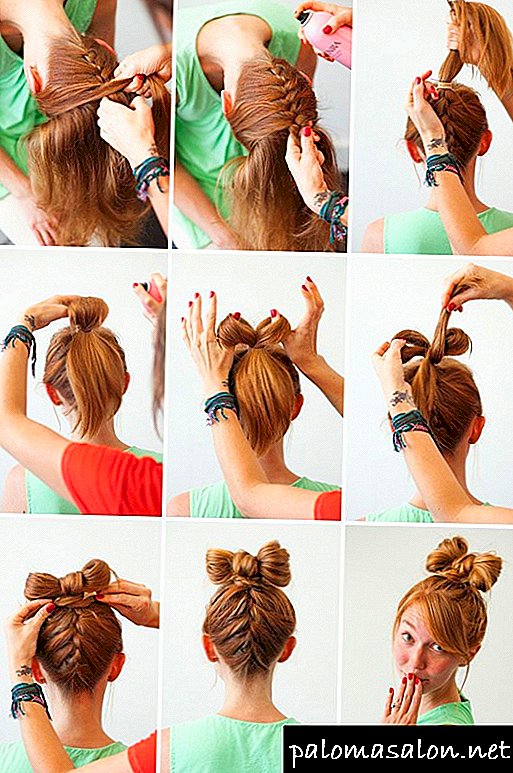
Bow in 3 minutes
It is suitable for medium length and long curls. If you have hair of different lengths, then the tips will be difficult to stab with 1 crab, use a few or stealth.
You will need: gum, comb and krabik.
- To collect hair in a high tail. In this case, you should have another 1 turn for threading hair. Pin up with invisible hairpins or hairpins drop down strands on the back of his head
- Make a bundle, threading the tail through another turn of the gum. You should have a bun and hair from the tail in front.
- We divide the bundle into 2 parts and transfer the remaining ends of the tail back through the middle. It turned out the middle.
- Wrap the tips in front to completely close it.
Video on creating a bow hair in 3 minutes, it works, just click on it and start playing:
Bow with bagels

To create a voluminous and festive bow you will need: a bank gum, 2 pins, 2 bagels, pins and stealth, silicone rubber.
- With the help of a bank gum and 2 studs we make a tail on the back of the head. We hold the collected hair with our hand, fasten the hairpin and wrap a rubber band around the tail several times, the second hairpin is similarly fastened to the tail. Carefully combing.
- We tie it on the end with a silicone rubber. Divide the tail into 2 parts and lay on the sides.
- The tip of the tail should be in front, then shift it back and fasten. We process the tip with varnish and fix it from behind - this is the middle of our bow. We fix on the tip of the tail another silicone gum. And from the back we fix at the base of the tail.
- It remains to raise the side of the bow. To do this, we hide the bagels in the side pockets and carefully hide them with the help of hands and varnish.
Training video on creating hairstyles for a bow with bagels from Eva Lorman:
Accessories
To keep the bow well, it should be fixed invisible. You can make your hair more stylish, adding to its decorative elements.
It can be:
- beautiful studs with pearls or rhinestones,
- artificial or live flowers.
The choice depends on the image that you want to create.
Feature of hairstyle-bow: it will suit a girl of primary school age and a refined socialite. The simplicity of creation and the elegance of the hairstyle make it extremely popular with both ordinary girls and stars.